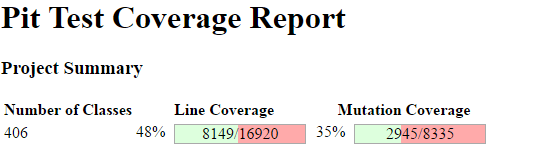
In this post I wanna write about the mutation testing performance. If you want to refresh your memory on mutation testing you can check my previous post. We saw there that mutation testing takes lots of time to run and that we cannot run it every time. I’ve described there some ways to improve the actual time needed to run it. First of all we need a codebase that has some tests. We can choose one of the open source libraries and apply mutation testing on it. Let’s go with hibernate-search, choose the engine module and run the tests.

As we can see it takes about 20 seconds. Okay. Mutation testing time.
Command to be used is:
mvn org.pitest:pitest-maven:mutationCoverage
And the results are:

A whopping 44 minutes. Considerably more time which makes mutation testing not usable for regular builds.
However some strategies can be applied here. I will just re-enumerate them here.
-
target classes/tests
-
incremental analysis
-
dependency distance – a test that directly calls a method from a mutant has a distance of 1 ,a test that calls a method on a class that uses the mutee has a distance of 2 and so on so forth.
-
number of mutations per class
-
mutation filter – filter the mutations based on criterias
Numbers 3,4,5 are trade offs between performance and relevancy. But do we care about performance here with the loss of quality? I mean a increase in performance would mean a drop in code quality. After all that’s why we run our code through Sonar and write tests. By the way there is now a sonar plugin for running pitest. Check it out here. These should not be used.
However strategies 1 and 2 are more useful.
Target classes/tests
This can be useful when developing. You scope here should be to target the tests you are working on and ignore the rest. Use the maven plugin configuration:
 <targetClasses>
     <param>yourpackage.*</param>
 </targetClasses>
 <targetTests>
     <param>yourpackage.*</param>
 </targetTests>
Incremental analysis
Before running the incremental analysis we should increase the number of threads using the system property -Dthreads. The command to be run is:
mvn -Dthreads=8 -DwithHistory org.pitest:pitest-maven:mutationCoverage
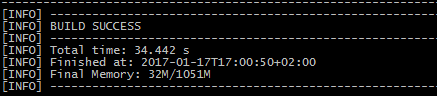
Incremental analysis is bases on reusing the previous runs. It works under the assumption that if you don’t change the classes the result will be the same. PIT will create a hash for every test and class. The system property -DwithHistory does this for us. The results are:

Much better. Now let’s run again the same command(the hashes should be now available).
Now it looks right.
SCM analysis
This works in someway similar with the incremental analysis. The difference comes with the fact that the change checks are delegated to the versioning system. In order to use this the SCM plugin must be configured properly. The command is:
mvn -Dthreads=8 -DwithHistory org.pitest:pitest-maven:scmMutationCoverage
In this way there the check will happen prior to commiting/pushing to the repository.
As I previously stated a good strategy is to let the CI server handle the mutation testing, and each developer should tests his code by targeting it. These configurations are extremely important when running mutation testing.
